Weigh the flours, psyllium husk, salt and baking powder into a large mixing bowl and mix thoroughly until evenly blended.
Add the oil and warm water and mix with a spoon/spatula until fully absorbed and even.
Using the back of the spoon or spatula, work the mixture against the side of the bowl until it forms an even, thick dough.
NOTE: The mixture may initially seem very wet. Do NOT add more flour. The psyllium husk takes time to hydrate. If concerned about it being 'runny' or 'wet', leave to hydrate for 10 minutes before working into a dough.
Next, work the dough in your hands (do not add any extra flour. It may help to wear silicone food gloves to prevent any sticking), kneading from one to the other until smooth. This will take no more than a minute.
Very lightly flour the work surface with TAPIOCA starch (it may help to place a large piece of baking paper down first to work on).
Break off a piece of dough for the first Roti and work into a smooth ball. Flatten in your hand, before placing on the work surface ready to roll.
Lightly dust the top of the flattened dough ball with a tiny amount of tapioca starch and roll out to a thickness of approximately 1½ to 2 mm.
Either shape the dough as you roll, or use a large round cookie cutter/fine-edged plate to cut the dough into a circle shape. Place the shaped flatbread dough onto a clean piece of baking paper while you roll the rest of the dough.
Repeat the rolling process with the next ball of dough, adding the off-cuts from the last piece and kneading-in before rolling.
Once you have rolled and shaped all the dough, heat the skillet/griddle pan until hot. Do NOT use oil. You want the pan to be thoroughly hot before starting the cooking process. If you have a small piece of dough left at the end of rolling, you can flatten and use as a test piece. The pan needs to be hot enough to cook the dough quickly (so that it doesn't dry out), but not so hot that it chars before being cooked. You'll find your perfect point by experience on the first couple of roti.
Place a shaped roti dough onto the hot pan and leave to cook until you just start to see bumps appearing on the surface. Now flip the flatbread using a silicone spatula.
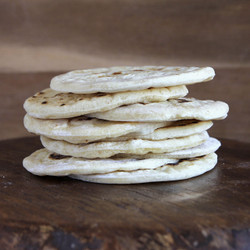
Press down very lightly for a few seconds to help the inside cook quickly, and then allow the bread to cook until colouring nicely on the underside. It is normal to have 'charred' spots.
Now flip the roti back over to finish cooking. This is when the magic should happen... After a few seconds, the roti should start to puff up. Watch and enjoy! It is very tempting to push the 'bubble' down and it is fine to press lightly to move the underside for more even cooking, but resist 'squashing' the bread too much. Let the bubble deflate naturally after removing from the heat.
When you are happy that the underside is cooked, remove from the pan with the spatula and place in a clean tea towel to keep warm whilst you repeat the process to cook all the roti.
Enjoy with curry, hummus, baba ganoush, guacamole, etc. Also delicious toasted and slit open to be filled (pita style), or toasted and cut into slices to dip with.
