Prepare the pan: Line the base of a 7-inch round springform pan with an 8-inch round of parchment paper. Secure the collar on the springform pan, closing it onto the base so the parchment round is clamped in. Lightly grease the sides of the pan with butter or nonstick cooking spray. ( I traced a circle on parchment using the bottom of the springform pan as the guide. This worked great! –Emma)
Make the crust: In a food processor, process the graham crackers into fine crumbs. You should have ¾ cup. (I recommend measuring out the crumbs as I had slightly more than ¾ cup. –Emma) Add the brown sugar and melted butter. Using one-second pulses, process the mixture until a uniform, sandy texture forms. Transfer the crumb mixture to the prepared pan and press firmly in an even layer onto the bottom and about ½ inch up the sides of the pan. Place the pan in the freezer to allow the crust to firm up a bit while you make the filling.
Make the filling: In the now-empty food processor, combine the softened cream cheese , heavy cream, granulated sugar, flour, and vanilla. (I wiped the food processor clean before doing this step. –Emma) Process the mixture in about 5 one-second pulses, just until it becomes a smooth filling. Stop to scrape down the sides of the bowl, if necessary. Add the eggs and the egg yolk one at a time, processing for 2 one-second pulses after each addition. Do not over-process the filling, or you will end up with an overly fluffy cheesecake. Using a spoon or a rubber spatula, gently stir in any remaining streaks of egg yolk. It is fine if a few streaks of egg yolk remain. Pour the filling into the prepared crust. Tap the pan firmly against the countertop a few times to remove any air bubbles in the filling.
Make a sling for the cheesecake: Fold a 20-inch-long sheet of aluminum foil in half lengthwise twice to create a 3-inch-wide strip. Center it underneath the pan to act as a sling for lifting the pan in and out of the Instant Pot.
Assemble everything in the pressure cooker: Pour 1 ½ cups water into the pot and place the trivet in the pot. Holding the ends of the foil sling, lift the cake pan and lower it into the pot. Fold over the ends of the sling so they fit inside the pot.
Pressure cook the cheesecake: Secure the lid and set the Pressure Release to Sealing . Select the Manual setting and set the cooking time for 32 minutes at high pressure. (My Instant Pot took about 8 minutes to come up to pressure before the cooking time actually began. –Emma)
Make the sour cream topping: While the cheesecake is cooking, make the sour cream topping. In a small bowl, whisk together the sour cream and confectioners’ sugar.
Release the pressure naturally and remove the cheesecake from the pot: When the timer goes off, leave the pot on its default Keep Warm setting for 20 minutes, letting the pressure release naturally. Open the pot, taking care not to drip condensation from the lid onto the cheesecake. Wearing heat-resistant mitts, grasp the ends of the foil sling, lift the springform pan out of the Instant Pot, and transfer the cheesecake to a cooling rack. Use a paper towel to dab up any moisture that may have settled on the top. (Be sure to dab up any water that pools on the sides too! – Emma) The cake will be puffed up and jiggle a bit in the center when it comes out of the pot, but it will settle and set up as it cools.
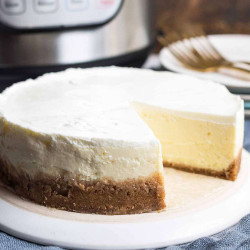
Add the sour cream topping: When the cheesecake has deflated about ½ inch, spread the sour cream mixture on top in a smooth, even layer. Let the cheesecake cool on the rack for 1 hour.
Cover and refrigerate: Let the cheesecake chill for at least 12 hours or up to 24 hours before unmolding.
Unmold and serve the cheesecake: To serve, unclasp the collar on the pan and lift it off. Then, use the parchment border to tug the cheesecake off the base of the pan onto a plate, where it can be sliced and served. (I ran a thin spatula between the cheesecake and the mold to make sure it released cleanly. You can also clean up any rough edges with the spatula before serving. Also, my leftover cheesecake kept just fine in the fridge for about a week! So good! –Emma)
