If possible, make the raspberry filling in advance! The extra time will allow the filling to thicken and develop its flavor. Place 3 cups of frozen or fresh raspberries, ⅔ of a cup of granulated sugar, 2 tsp lemon juice, 2 tsp lemon zest, and ¼ cup of water in a saucepan and heat over medium-high heat.
Stir the mixture until it begins to boil. Lower the heat to medium-low and allow the filling to simmer for 10-15 minutes. Turn off the heat and remove the pot from the stove.
Pour the filling into a metal strainer suspended over a medium-sized bowl and push the mixture through using a rubber spatula. Use a decent amount of pressure to really get all the liquid through the sieve. You should be left with about ½ cup of seedy pulp which can be discarded or composted. If you don't mind the seeds in your filling, skip this step and leave the filling in the pot.
In a separate small bowl, make a slurry by combining the remaining 2 Tbsp of water with 2 Tbsp of cornstarch. Stir until the cornstarch has fully dissolved into the water.
Add the cornstarch mixture to the strained raspberry filling and stir until incorporated.
Rinse out the pot then pour the filling back into it. You don't want any residual seeds getting into the filling!
Heat on a medium-high heat and stir constantly during this stage to prevent the filling from burning. Cook until the mixture begins to boil, then reduce the heat to medium-low. Continue to stir and cook for a few additional minutes to let the filling cook down and thicken.
Turn off the heat and pour the raspberry filling into a separate bowl to let it cool. Cover with plastic wrap and place in the fridge for at least 1 hour, or preferably overnight.
Next, make the fluffy white cake layers. Preheat oven to 340°F/171°C. Line and grease four, 7-inch pans or three, 8-inch cake pans with parchment rounds.
Add 1 cup of unsalted butter and 3 cups of granulated sugar into the bowl of a stand mixer. Mix together on a high speed with a whisk attachment for 2-3 minutes. Scrape down the sides of the bowl as needed with a rubber spatula. The mixture should become lighter in color as air is whipped into it.
Add in 1 cup of egg whites and mix at a medium speed until they're incorporated.
Whisk 3 cups of cake flour, 2 ½ tsp of baking powder, and 1 tsp of salt together in a separate bowl.
Add half of the dry ingredients into the butter/egg mixture and mix on medium speed until incorporated.
Add 1 ½ cups of sour cream, ¼ cup of oil, 2 Tbsp lemon juice, 2 tsp lemon zest, and 1 tsp vanilla extract. Mix on a medium speed until combined. Scrape the sides and bottom of the bowl as needed.
Mix in the remaining dry ingredients at a medium speed.
Divide the batter evenly between the prepared cake pans. I like to use a digital kitchen scale to weigh my pans to make sure my layers bake up to be the same height.
Bake for 38-42 minutes, or until a toothpick comes out with a few moist crumbs. Rotate the pans halfway through to help them bake evenly.
Allow the pans to cool for 10 minutes, then run an offset spatula around the perimeter of the pan to separate the cake from the pan.
Place the cake layers into the freezer for 45 minutes to accelerate the cooling process. Once the layers are fully cooled, carefully flip the pans and remove the layers from the pans.
Use a serrated knife to level the tops and trim the sides to remove any caramelization.
To make sure these cake layers are nice and moist, make a simple syrup. This is optional but really adds to the texture of these cake layers.
Add ⅔ cup water and ⅔ cup of granulated sugar into a small saucepan.
Cook over medium heat, and stir continuously until the mixture just starts to boil. It usually takes about 2 minutes for my simple syrup to reach a boil. At this point, the sugar should have fully dissolved and the mixture should look clear.
Remove from heat. Pour into a separate container and cool to room temperature. Set aside.
If you're making this in advance, it can be stored in an airtight container in the fridge for up to a month. Wait to brush the cake layers with the simple syrup until right before you assemble the cake.
While the cake layers bake and cool, make the white chocolate buttercream frosting.
Beat 2 cups of butter on a low speed for 30 seconds with a paddle or whisk attachment until smooth.
Add in 2 Tbsp lemon juice, 2 tsp fresh lemon zest, 2 tsp vanilla extract, and 1 tsp fine salt and beat on low.
Slowly mix in 7 cups of powdered sugar on a low speed. Add ⅓ cup of heavy cream halfway through to make the frosting easier to mix.
Mix in the melted (and cooled) white chocolate on a low speed and scrape down the sides and bottom of the bowl with a rubber spatula as needed.
Continue to mix until the ingredients are fully incorporated and the desired consistency is reached.
If the frosting seems too thick, add in additional cream (1 tablespoon at a time). If the frosting is too thin, add in more powdered sugar (a quarter of a cup at a time).
Stir by hand with a rubber spatula to make the frosting extra smooth. Place half of the frosting in a large piping bag. Cover the remaining frosting with plastic wrap and set aside.
Note: If you want to make raspberry white chocolate buttercream, mix in either ½ cup freeze-dried raspberry powder + ⅓ cup of heavy cream at this point, or mix in ½ cup of seedless raspberry jam.
Use a silicone brush to brush the top of the leveled cake layers with simple syrup. Then stack and frost the cake layers on a greaseproof cake board using a dab of frosting to help stick the first cake layer to the board.
Spread an even layer of white chocolate buttercream on top of the first cake layer (using the frosting in the bag). Pipe a ring around the edge of the cake, then spread the raspberry filling inside the ring. Use half of the filling per layer if you make a cake with 3 layers, use ⅓ of the filling if you make a cake with 4 layers.
Repeat with the remaining cake layers, then chill the cake in the fridge (30 minutes) or freezer (10 minutes) until the frosting between the layers is firm to the touch.
Spread a thin coat of white chocolate frosting around the cake using the frosting in the piping bag to fully cover the cake layers. Smooth using a bench scraper, then chill the cake again in the fridge (30 minutes) or freezer (10 minutes) until the crumb coat is firm to the touch.
Add a second, thicker layer of white chocolate frosting to the cake and smooth using a bench scraper. If you're struggling to get smooth sides on your cake, I share all my tips and tricks in this smooth cake tutorial.
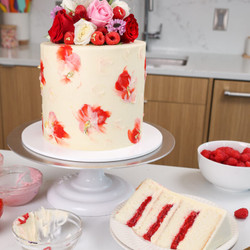
Then decorate as desired! I chose to color the remaining buttercream different shades of pink and dab them around the cake for a bit of texture. I also topped the cake with fresh raspberries and flowers!