 Sort ingredients
 pamelavalarie
 QR Code
 Listen
 Pdf
Pdf
In a large bowl, whisk together the gluten free flour blend, sugar, xanthan gum and salt.
Add the cubed cold butter and toss it in the dry ingredients. Using your fingertips or a pastry cutter, work the butter into the dry ingredients until it's about the size of walnut halves.
Start adding the cold water, about 1 tablespoon at a time. After each addition, use your fingertips or a fork to toss the mixture around so that the flour gets evenly hydrated. Continue adding the water and tossing the mixture until all the flour has been hydrated and the mixture starts clumping together in places. It might still look crumbly at this point. Tip: Depending on your gluten free flour blend, you might need slightly more or less water than is listed in the recipe. If there are any patches of dry flour, sprinkle them with some extra cold water.
Bring the pie dough together into a ball by giving it a gentle knead and pressing it against the sides of the bowl. Your dough won’t look perfectly smooth at this stage – it will look slightly “shaggy” and uneven, with a few cracks here or there. Be careful not to overwork it, as that can cause the butter to start melting due to the heat from your hands, which can reduce the flakiness of the final pastry.
Wrap the pie dough in plastic wrap/cling film, and chill it in the fridge for at least 30-45 minutes.
On a lightly floured work surface, roll out the chilled pie dough into a long rectangle about ¼ inch (about 5-6mm) thin. The exact dimensions of the rectangle aren’t important, aim for a length that’s about three times the width.
First letter fold: Fold one third of the rectangle towards the centre and then fold the other third over it (as you would a letter).
Rotate the folded pastry by 90 degrees, so that the open ends point towards and away from you, and roll it out again into a long rectangle.
Second letter fold: Fold one third of the rectangle towards the centre and then fold the other third over it (as you would a letter).
Wrap the finished pie dough tightly in cling film/plastic wrap and chill it in the fridge for at least 30-45 minutes before rolling it out and assembling the galette.
Adjust the oven rack to the lower middle position and pre-heat the oven to 400ºF/200ºC. You will need a large baking sheet, set it aside until needed.Tip: Baking the galette on the lower middle oven rack ensures that the bottom of the pastry will be perfectly crisp and golden, without any sogginess whatsoever.
Cut the peaches into about ½-inch (1-1.5cm) thick slices/wedges. Put them into a large bowl and set aside until needed.
Lightly flour a large sheet of parchment/baking paper and place the chilled pie crust in the centre. Roll out the pie crust into a rough circle, about 13-14 inches (32-36cm) in diameter. You can trim the edges to achieve a more perfectly round shape if you wish, though it's not necessary.Tip: Rolling out the pie crust and assembling the galette on the sheet of parchment/baking paper allows you to simply just slide it onto the baking sheet with minimal fuss and without having to worry about the pastry tearing or cracking.
Add the sugar, cornstarch (US)/cornflour (UK), lemon juice and vanilla to the sliced peaches and toss to combine.
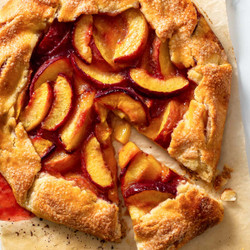
Arrange the peach filling in the centre of the rolled-out pie crust in an even layer, leaving a 2-inch (5cm) border free of any filling. Tip: You have two options when it comes to the filling – you can just dump it into the centre of the rolled-out pastry OR you can arrange all the individual slices carefully, in a pretty design. Both options work great, so just go with whichever one you fancy!
Fold the edges of the pie crust over the filling, overlapping the pastry as necessary.Tip: The pie crust might crack in places, that's okay. Patch up any large cracks to prevent the peach juices from leaking out during baking, but don't stress too much – galettes are meant to be rustic!
Drizzle the juices left in the bowl over the filling.
Brush the pie crust with the whisked egg, and sprinkle both the crust and the filling generously with granulated sugar.
Trim the parchment/baking paper if necessary, so that it will fit into the baking sheet. Slide the assembled galette together with the parchment/baking paper onto the baking sheet.
Bake on the lower middle oven rack at 400ºF/200ºC for about 40-45 minutes or until the pie crust is deep golden brown and you can see the juices in the filling visibly bubbling (not just around the edges but also in the centre).Tip: For the cornstarch to achieve its full thickening power, the juices need to come to a boil – so, it's important that you bake the galette until you see bubbles popping up through the filling.
Allow the galette to cool until warm before slicing and serving, ideally with a scoop of vanilla ice cream.Tip: I recommend sliding the baked galette off the parchment/baking paper and onto a wire rack while it cools – this prevents the bottom from becoming soggy from the steam.
The gluten free peach galette is best served on the day of baking, as the crust will soften with time from the peach juices. However, you can keep it loosely covered in a cool, dry place or in a closed container in the fridge for up to 2 days – just keep in mind that the pie crust won't be as crisp as on the first day.