 Sort ingredients
 cawlensing
 QR Code
 Listen
 Pdf
Pdf
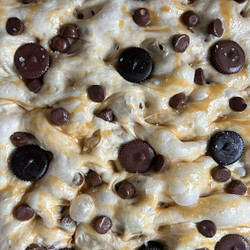
For the peanut butter cups, you can of course use Reese’s if you prefer to - I’d suggest using the little foil wrapped ones instead of the full sized ones. I like the quality of the chocolate on the Trader Joes ones so opted to use those (a mix of milk and dark choc) but you do you! Reese’s also sells the miniature unwrapped PB cups just like the ones I used in my video (the chocolate chip sized ones).
Instead of using a 9x13 inch tray as the dough recipe calls for, opt to use a larger tray - 13x18 inches (or similar) is great. You want a larger tray here to help ensure there is lots of surface area for all the toppings. You won’t need to spread the dough all the way to the edges of the tray but it should definitely measure larger than 9x13 inches after you’re done dimpling it.
Mix the base focaccia dough - you can use my ‘Overnight Focaccia’, ‘Same-Day Focaccia’ or ‘The Best Sourdough Focaccia’.
You will need to incorporate some of the peanut butter and mini peanut butter cups into the dough during both sets of stretch and folds.
Microwave the peanut butter until it’s reached drizzling consistency (30/45 secs). When it’s time for the first stretch and fold, drizzled half of the melted peanut butter (just over 2.5 tbsp/42g) and sprinkle half of the mini peanut butter cups (⅓ cup/55g) onto the dough and stretch and fold as instructed in the recipe. Cover and rest the dough for 15 minutes and then repeat with the second half of the peanut butter (you may need to rewarm it again) and mini peanut butter cups. Cover the bowl of dough with a clean towel and let it rest and rise at room temperature for about 1-1.5 hours (or cover with plastic wrap and place into the fridge if using the overnight recipe).
I used about 20 of the Trader Joes peanut butter cups here (a mix of dark and milk) and cut half of them in half just to distribute the toppings a little more evenly - I still wanted a few whole PB cups inside for that super gooey effect though!
When the dough has fully proofed in the bowl, tip the it onto the prepared tray (I used olive oil here but you can use your oil of choice) and gently stretch it out into a rectangle shape so there is plenty of surface area to accommodate the peanut butter and peanut butter cup filling.
Drizzle the melted peanut butter (4 Tbsp) onto the entirety of the dough and place the space the peanut butter cups (1.5 cups/235g) out evenly across the dough. Press the toppings into the dough to stick and then fold one third of the rectangle towards the center of the dough. Scatter more PB cups over the top of that fold (if you have more) and then fold the other third of the dough over the first fold (see my video tutorial on Instagram @ for visual guidance). Seal the edges of the dough so all the toppings are enclosed and then flip the entire thing over so the smooth side of the dough is on the top. Cover with another inverted tray to proof for 1-1.5 hours.
Near the end of the proofing time, preheat the oven to 215C/420F and place the rack in the bottom position.
Place 1 Tbsp salted butter and 1 Tbsp peanut butter into a small microwaveable bowl and microwave for 45 seconds (or use a saucepan). Stir until smooth.
Drizzle the butter/peanut butter over the entirety of the dough and then scatter over the mini peanut butter cups. Dimple thoroughly. Push the remaining peanut butter cups into the dimples (if using full sized Reese’s cups, cut them into quarters or opt to use the mini foil wrapped Reese’s cups).
Bake on the lowest rack of the oven for 18-23 minutes. Watch is closely as the sweet focaccias can brown more quickly.
Remove from the oven, transfer to a cooling rack and let it cool for at least 25 minutes before cutting in (it will still be gooey). If you’d like more defined/hardened peanut butter cups inside, wait at least 2 hours to cut in.
This is incredible when used for French toast (with maple PB syrup) or simply toast it up and enjoy with some salted butter.