 Sort ingredients
 harmonybat
 QR Code
 Listen
 Pdf
Pdf
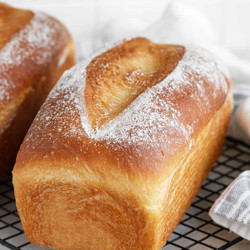
This bread can be made by hand or with a stand mixer. The instructions below are for using a stand mixer. If making by hand, mix the dough in a bowl with a spoon for about 2 minutes, then remove to a floured work surface and knead about 5 minutes, adding additional flour only if the dough is sticking to your hands or the work surface.
Tip! Use of a kitchen scale is highly recommended for the best and most consistent results!
Place the bowl of the stand mixer on a scale and weigh out the flour, instant yeast, salt and sugar in the bowl (or measure and add to bowl). Place the bowl on the mixer fitted with the paddle attachment. Use the paddle attachment to mix up the flour mixture.
Warm the milk to lukewarm and add to the flour mixture along with the oil and egg. Use the paddle attachment to mix on the lowest speed for about 2 minutes. Remove the paddle attachment, scraping any dough on the paddle back into the bowl. Scrape down the sides of the bowl as well. Place the kneading hook on the mixer.
With the kneading hook in place, knead the dough at Speed 2 on a Kitchenaid mixer for about 5 minutes. The dough should clean the bowl and should be soft and a bit tacky, but not sticky. Don't add any additional flour to the bowl. You can adjust on the counter if needed.
Remove the dough to a lightly floured work surface. Knead the dough for about 1 minute, only adding additional flour if the dough is sticking to your hand or the work surface. For the dough into a ball.
Spray a large bowl with cooking spray. Place the dough ball into the greased bowl top round-side down, then flip the dough ball over so the round side is up and is covered in the oil from the bottom of the bowl. Cover the bowl tightly with plastic wrap and immediately place into the refrigerator.
Refrigerate the dough at least 12 hours or up to 4 days.
When ready to bake, remove the dough from the refrigerator. Deflate the dough and place it onto a scale to weigh the total weight of the dough. This is typically in the 1400g range. Divide the dough into two equal pieces (typically around 700g). For the two dough pieces into balls.
Spray two 8 ½ x 4 ½ inch loaf pans with cooking spray and set aside.
Flip the dough balls upside down (so the smooth side is down). Using the heel of your palm, press the dough into a roughly 6-inch wide by 8-inch long rectangle.
Tip! If these instructions are unclear, refer to the step-by-step photos above this recipe card. Fold the two corners closest to you in about ¼ of the way, then roll the dough up tightly starting from the end you turned in. With each roll, use your fingertips to press the bottom of the roll into the base as you roll. When you reach the end, pinch together the seams and pinch the ends as well. Your dough roll should be roughly 8-inches long at this point. Place into prepared loaf pan, then repeat with the other dough ball.
Spray a large piece of plastic wrap with cooking spray. Place overtop of the two loaf pans with the sprayed side down.
Allow the dough to rise in the pan until the dough fills the pan and crests the pan by 1 ½-2 inches. This can take anywhere from 2 ½ - 4 hours, depending on how cool the dough was to start with and the temperature of your kitchen. In my 72F kitchen, this typically takes about 3 ½ hours.
When the dough is about risen, preheat the oven to 350F (non-convection).
Prior to baking, you can flour and slash the loaves if you like. Use a fine mesh strainer to dust the loaves with flour, then use a sharp paring knife to make one swift and firm slash across the top of the loaf.
Bake the loaves for 20 minutes, then rotate the pans front to bake and left to right and bake for another 20-25 minutes or until the loaves are golden brown and are at least 185F internal temperature.
Remove the loaves from the oven and immediately remove the loaves from the pans to a cooling rack. Cook at least 1 hour before slicing.