 Sort ingredients
 tofran
 QR Code
 Listen
 Pdf
Pdf
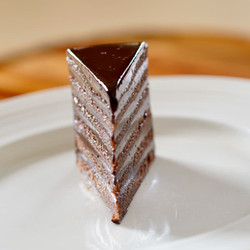
To start, it is recommended to make the Pain de Gêne sponge cake a day or two in advance to allow it to rest and develop its flavors. In addition, the cake will be easier to slice. In a food processor, pulse powdered sugar and almond meal to create a fine powder known as tant pour tant (TPT). Essential in macaron making. It achieve a lighter batter texture ensuring smooth integration into the batter and a finer crumb structure. In a stand mixer fitted with the whisk attachment, beat the almond-sugar mixture and eggs on high speed for approximately 8 minutes until light and fluffy. Meanwhile, sift together flour, cocoa powder, and baking soda to ensure a smooth and airy texture in the final cake. In a large pastry bowl, gently fold one-third of the egg mixture with melted butter, then add the sifted powders and carefully fold in the remaining batter until fully incorporated. Pour the batter into the prepared cake pan.
Preheat fan oven to 330ºF/160ºC. Bake cake for about 50 minutes until is set and a skewer inserted into the center comes out clean. Allow the Pain de Gêne sponge cake to cool completely before using.
Bring to a boil water, sugar and vanilla. Flavored syrup with alcohol if desired. Use the punch at room temp.
Chop chocolates if needed and melt over a bain-marie; stirring up every so often – do not over heat chocolate; remove from bain-marie as soon as it is melted. Meanwhile, bring to a quick boil heavy cream. Mix a third of the hot cream in the melted chocolate with a rubber spatula and add remaining heavy cream gradually. Smooth out and add hazelnut praliné/spread (it must be at room temp, do not add it cold). Smooth out ganache using an immersion blender if needed. Leave ganache at room temperature until ready to use.
Line the inside of the cake ring with a cake collar or parchment paper to prevent sticking and ensure smooth edges. Place the cake ring on a flat tray lined with parchment paper for easy handling. Cut the sponge into six equal slices and keep them in the correct order. The bottom sponge slice will serve as the cake base and remain in place. Place the first sponge layer inside the prepared cake ring and press it down evenly using a flat-bottom device to ensure a firm base. Lightly moisturize the sponge with the punch to keep it moist. Pipe the first layer of ganache over the sponge, ensuring it touches all sides of the cake ring for structural integrity. Avoid overloading; the ganache layer's thickness should match that of the sponge for balanced proportions. Alternate between sponge layers and ganache until all layers are assembled. Press gently after each layer to maintain evenness. Spread a thin layer of ganache on top of the final sponge layer. Smooth it out evenly with an offset spatula to create a polished surface.
Freeze the chocolate cake for 4 hours at least before un-molding. Keep it frozen until ready to glaze.
Chablon is a versatile technique where melted dark chocolate is combined with a small amount of oil (10%) to create a protective coating for cakes. It offers structural support, especially for cakes that have been moistened with syrup, preventing them from becoming too delicate. Here's how to apply it: Flip frozen cake and quickly spread chocolat to cover the bottom cake. Flip the cake and keep it frozen until ready to glaze.
Melt chocolate with oil (do not over heat chocolate–just melted and remove from bain-marie). Transfer melted chocolate to a narrow container and add cocoa powder. Meanwhile, bring to a light boil heavy cream combined with honey and pour in chocolate and mix using an immersion blender keeping the nozzle down to prevent air bubbles to form. Pass through a sieve and keep at room temp until ready to glaze.
Place the frozen or partially frozen cake on a tray lined with plastic wrap. Set the cake on a cooling rack positioned over the tray to catch excess glaze. Heat the chocolate glaze to a precise 108ºF/42ºC. Starting from the edges, pour the glaze and work toward the center. Immediately smooth the surface with a large offset spatula, moving in a single motion from 6 o'clock to 12 o'clock. Gently tap the tray against the countertop to release air bubbles and create a smooth, even glaze.Let the cake sit for about 10 minutes at room temperature to allow the glaze to set slightly. Heat a large offset spatula (use hot water and dry it thoroughly). Slide the heated spatula under the cake, ensuring even support, and carefully lift it off the cooling rack. Transfer the cake to a flat tray or serving dish.
The chocolate cake shall be completely thawed before cutting. Heat up the knife blade in hot water or run it quickly over the flame. Mark cake first and cut into 12 portions. Clean off and rewarm the blade between each cut.
Use a kitchen blowtorch or a hair dryer to gently and briefly heat the surface of the cake or slice. This will create a beautiful, glossy sheen. Chocolate ganache cake tastes best when served at room temperature. This allows the flavors to fully develop and the texture to be soft and luscious. For individual slices, microwave for just a few seconds to create a melt-in-your-mouth texture. Add a "wow" factor by flambéing the cake right before serving!
If the room temperature is above 77ºF/25ºC, the cake can be kept out for up to 2 days. Otherwise, keep it in the fridge for up to a week. Ganache base cakes can also be vacuumed-sealed a kept frozen for up to 6 months. Do do so, cut cake into desired portions first, and freeze them overnight. Next, vacuum-seal the portioned cake. When ready to serve, remove frozen cake from the bag and let it thaw overnight in the refrigerator.
Bon appétit!