Step 1: Get Your Oven and Pan ReadyFirst up, crank that oven to 350°F (175°C). Find your trusty 8×8 inch baking pan. Line it with parchment paper – leave a little extra hanging over the sides like handles. Best trick ever for lifting them out later! Maybe give the paper a quick spray with non-stick too, just to be safe.
Step 2: Mix Up That Brownie GoodnessMelt your butter – gently on the stove or zapped in the microwave works. Pour the melted butter into a big bowl and whisk in the sugar. It’ll look kinda grainy, totally normal. Now, beat in your eggs, one after the other, then splash in the vanilla. In another little bowl, whisk the flour, cocoa powder, and salt together. Dump the dry stuff into the wet stuff and mix just until you don’t see big streaks of flour anymore. PLEASE don’t go wild mixing here – we want fudgy, not tough! Gently stir in those chocolate chips. Now, scoop out about half a cup of this batter and set it aside. We need it for swirling later! Spread the rest of the batter evenly in the bottom of your prepared pan.
Step 3: Whip Up the Creamy Cheesecake PartRemember that super soft cream cheese? Now’s its time to shine. In a bowl, beat it with an electric mixer (or a whisk and some elbow grease) until it’s totally smooth. Beat in the sugar, then the egg yolk, and finally the vanilla. Keep going until it’s smooth, creamy, and utterly irresistible. Try not to eat it all with a spoon.
Step 4: Layering Time!Okay, plop spoonfuls of the cheesecake mixture all over the brownie batter in the pan. No need to be neat about it yet. Now grab that brownie batter you saved and drop spoonfuls of that over the cheesecake layer.
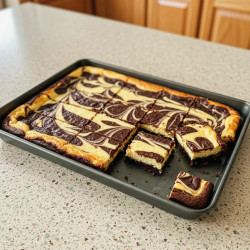
Step 5: Get Your Swirl On!The best part! Grab a butter knife or even a chopstick. Gently swirl the two batters together. Think lazy figure-eights or zig-zags. You want it marbled and pretty, not completely mixed together. Don’t overdo it! A few good swirls are all you need for that classic cheesecake brownie look.
Step 6: Bake ‘Em Up!Carefully slide that pan into your hot oven. Let it bake for about 30-35 minutes. You’ll know they’re ready when the edges look set and if you poke a toothpick into a brownie section (try to miss the cheesecake!), it comes out with moist crumbs, not wet goo. The cheesecake parts might still jiggle a tiny bit – totally cool, they’ll firm up as they cool down.
Step 7: Chill Out! (Seriously, Let Them Cool)This is pure torture, I know, but you have to let these beauties cool down in the pan on a wire rack. Give them at least 30 minutes, but honestly, an hour is even better. They get fudgier and set up properly, which means you can cut them into nice squares (or those cool wedges like in the pic!) without making a mess. Once cool, use those parchment handles to lift the whole slab out. Genius, right?