 Sort ingredients
 sandramort
 QR Code
 Listen
 Pdf
Pdf
Mix together your “flour” ingredients (lupin flour, vital wheat gluten, and oat fiber) in a bowl & whisk until evenly distributed. Set aside.
In your stand mixer bowl, add instant yeast, sugar (or Inulin), and filtered (or distilled) water warmed to 80°F (*see note 1 for water temperature adjustments). To ensure that your yeast is active (& not old or bad), allow the mix to sit for 5-7 minutes until you see foamy bubbles appear (it SHOULD look like the yeast is ‘blooming’’/foaming/expanding slightly in the water). If you don’t see any bubbles, expansion or changes, then your yeast might be bad or old! You will need to replace it.
Once your yeast is foamy and blooming, add lightly whisked eggs + egg yolks, and allulose to the stand mixer. Using a dough hook, mix together on a low speed until lightly combined. Add half of your low carb “flour” mix and continue kneading on the level 2 (lowest mixing speed) of your mixer for 3-4 minutes. Add the other half of the low carb “flour” mix and continue kneading (still at level 2) for 9-12 more minutes. If the dough is getting too tightly wound around the hook at any point you can stop the mixer pull the dough off the hook, flip it over in the bowl & then resume kneading again. The dough should look cohesive, smooth and stretchy (hello gluten development!) . Add Kosher Salt & Avocado Oil to the dough, and knead on low speed until the dough is smooth and the oil has been completely kneaded in (no greasiness should be left in the dough/bowl), which should take 5-8 more minutes of kneading. Once the dough looks SMOOTH and is not greasy to the touch, turn off your mixer and gather all the dough in your hands (some of your dough may appear stringy or not all in one even ball , and this is okay! It is just tight from good gluten development). Form the dough into a smooth ball shape as best you can. If you can gently knead it on the counter a few times, it will turn into a SUPER smooth ball. Set the dough ball back into the mixer bowl and let the dough rest/RELAX at room temperature for 10-15 minutes (and NO more)!
After the dough has relaxed for for 10-15 minutes, use a bench scraper (or a knife) to cut the dough into 4 equal pieces (tip: use the scale to weigh & divide by 4 if you want them all exact same size). Now, you can shape your Challah Braid! *watch a how to braid a 4 strand challah loaf video here). TO SHAPE: Take one of your 4 pieces of dough and gently flatten the dough with your hands into a rectangular/oval shape with long edge parallel to you. Pull the Long edge thats farther from you towards the middle of the dough and pinch or seal with your hand then continue rolling the dough into itself forming a log shape. Placing your hands on the middle of the dough log roll it back and forth with your hands moving out towards ends of the rope to create a 12-14 inch long ‘rope’ (mine were around 14 inches!). Do this with each piece of dough. Line up your 4 ropes evenly on the counter and pinch them together at the very top (making a tee-pee shape). Start by picking up the farthest left strand, pulling it towards the rightand weaving it by taking it over the strand second to the left, then under the next strand to the right, and finally over the last strand on the farthest right. Now, using whichever strand is NEWLY placed on the farthest left-repeat the process again (farthest Left strand goes over the strand to the right of it, then under the next one and over then over the farthest right strand). Continue this exact same left to right (over, under, over) set until you reach the bottom of the braid. Pinch the ends of the strands together at the bottom of the braid and tuck both the top end point and bottom end point of the loaf under itself (just an inch or so of each end tucked under the loaf)!
Gently place your challah braid onto a greased or lined baking sheet (I use a silpat baking mat). Cover the whole baking sheet loosely with a lightly oiled piece of seran wrap or a kitchen towel and let it rise on your kitchen counter for 1.5-2.25 hours or until doubled in size. If your kitchen is a little on the cooler side (below 70-72 °F), your rise time will be slightly longer. If your kitchen is warmer than 72 °F then your rise time will be a little shorter. I actually prefer it to be cooler, because the LONGER the rise time, the BETTER the flavors that develop in your bread loaf! *** ALTERNATIVELY, you can place your shaped challah loaf in the fridge to rise OVERNIGHT (instead of at room temperature) – which will even FURTHER enhance the delicious yeasty flavor! SEE NOTE 3 for tips/instructions for an overnight rise and bake***
Preheat your oven to 340° F while your dough is rising. You can and conduct a “finger poke” test to check if your dough has risen enough to bake! *To do this, gently poke your dough & see how it bounces back. If it the poke does NOT leave a mark and the dough bounces/springs right back, then it needs MORE time. If the poke leaves a mark but very slowly and slightly starts to bounce back, then it’s perfectly risen and ready to bake. If the poke leaves a big flabby dent that doesn’t bounce back at ALL, then it may have overproofed 🙁
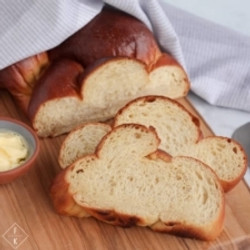
Whisk together leftover egg whites + 1 tablespoon of water until a few foamy bubbles form to make the egg wash. Use a pastry brush and paint the egg wash onto your challah loaf everywhere but the bottom. Bake at 340 °F for 25-31 minutes until it’s a deep golden brown on top (mine took exactly 30 minutes). Please NOTE, the HEIGHT and Width of your Braid will determine how long this needs to bake in the oven! Mine, was quite large and baked for exactly 30 minutes. If yours is skinnier (please reference the photo in my post of MY risen challah braid), it may need less time, closer to 25 minutes! If it’s getting SUPER dark brown- then it’s getting over done! Let your Low Carb Challah Loaf cool COMPLETELY BEFORE slicing into (cooling it all the way SETS the crumb & prevents deflation- it’s SUPER important!).
Store your Loaf at room temperature in an airtight container or ziploc bag to prevent drying out. Your baked Challah loaf also FREEZES fantastically! Just Slice before freezing and place in an airtight bag! To thaw frozen slices, remove them from the freezer bag (to prevent sogginess during defrost) and let them thaw on the counter for 30-45 minutes, OR pop them in a toaster! 🙂 ENJOY!