 Sort ingredients
 jackyrag
 QR Code
 Listen
 Pdf
Pdf
Peel the pineapple and remove core and ‘eyes’.
Cut the pineapple flesh into small dice, about 5mm.
Strain for about 10 minutes to remove excess juice.
Place pineapple and sugar in a wide non-stick pan and cook over low medium heat until most of the moisture has evaporated, about 30 minutes, stirring often.
Add butter and stir continuously until butter has melted into the pineapple. Keep the heat on to help evaporate moisture from the butter, but do not cook for more than about 5 minutes in order to preserve the taste of the butter. The mixture will appear soft, but it will stiffen when cooled to room temperature.
Spread mixture thinly on a large plate to cool completely before using.
Dice butter and shortening into approximately 1cm cubes. Freeze for 15 minutes.
Add dry ingredients in the bowl of a food processor and mix.
Tip frozen butter and shortening, and the beaten egg into food processor bowl, and pulse until crumbly.
Tip mixture onto a pastry mat and quickly press together with your hands to form a ball. Do not knead, to avoid gluten developing and toughening the baked crust. Press dough into a disc and place in the fridge to rest for 30 minutes.
Note: The dough can also be made by creaming together the fats and the sugar, then adding the egg, and finally combining with the dry ingredients to create a crumble. This can then be pressed together to form a ball, in the same way as the food processor method.
Precise weights are important to ensure each pastry fits the mould snugly. Divide pineapple jam filling into portions of 20 grams each, and roll each portion into a ball.
Divide pastry dough into portions of 25 grams each, and roll each portion into a ball.
Flatten a dough ball. You can do this in your palm or with a small rolling pin, but It is easiest to do this in a tortilla press between two pieces of silicone greaseproof paper.
Place a portion of filling into the centre of the flattened dough.
Gently wrap the dough around the filling, pinching away and setting aside excess dough at the top and where the edges meet. Roll the filled dough between your palms to form a smooth ball.
Place the ball into a metal mould.
Gently press down using your fingers or a small pointed spatula, to ease the dough into the corners of the square mould. The dough will not quite reach the top of the mould – the pastry will expand when baked in the oven. Pave over any thin patches and cracks with the excess dough set aside earlier, smoothing the surface with the spatula. Turn the mould over and repeat on the other side.
Place the shaped pastries, all still inside their moulds, on a baking sheet.
When all pastries have been shaped, put the baking sheet into the fridge and chill for 15 minutes.
While pastries are chilling, heat the oven to 170 C.
Bake the pastries for 8 minutes. Remove the baking sheet from the oven and turn each pastry over.
Return the pastries to the oven and bake 5-8 more minutes, until the top is slightly golden, checking regularly after 5 minutes. Do not over bake or the filling could expand and crack through the dough surrounding it.
Remove the pastries from the oven, lift off the moulds and cool the pastries on a rack.
One side of the pastry might be more coloured than the other – this is fine, you can turn them all on the same side for a uniform look, or turn them on different sides for contrast.
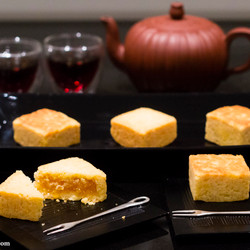
The pastries can be enjoyed fresh and warm.
However, convention is to leave the pastries overnight in an airtight container, after which the crust will have become more tender.
The pastries should keep at room temperature for 3-4 days. Mine are all eaten within this this period so I’m afraid I don’t know what their maximum shelf life would be.