 Sort ingredients
 tentakulls
 QR Code
 Listen
 Pdf
Pdf
In a medium bowl, whisk together all of the dry ingredients: all-purpose flour, freeze dried strawberry powder, baking powder baking soda, and salt.
In a stand mixer using the paddle attachment (can alternatively use hand mixer or whisk), mix the butter and sugars on medium speed until combined. Scrape bottom of bowl. Add vanilla and egg and mix again. Mix in pink food coloring.
Dump in all of the dry ingredients and mix until combined. Add more pink food coloring as needed.Take about 2 tbsp of dough and add to another bowl. Mix in red food coloring. This will be for Kirby's feet. Cover the doughs and let it rest in the fridge for 20-30 minutes. This will let the flour hydrate and let the butter cool, yielding chewier cookies. The dough will also be easier to work with. :)
Preheat oven to 325°F/163°C and line two baking trays with parchment paper or silicone mats.
In a small bowl, add granulated sugar for rolling the dough.
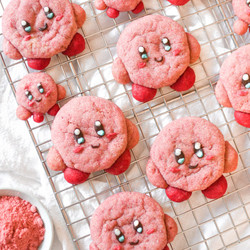
Use small cookie dough scoop to gather dough (about 1 ½ tablespoon each). Shape into a ball and roll in granulated sugar. Place onto lined baking tray. This will be Kirby's body. Repeat for about 10-12 cookies, making sure you have some left over for the arms.For the arms, take about 1 tsp of dough, and split it into two equally sized pieces. Roll into balls and place on the sides of Kirby's body.To make the feet, scoop about 1 tsp of red dough and equally split it into two balls. Then, place them at the bottoms of each Kirby. Place Kirby cookies about 3-4 inches apart.
Bake for 9-11 minutes. For soft cookies, bake them until the edges are set and firm. For chewier ones, bake for 1-3 more minutes.If the Kirby's aren't perfect circles, you can use a rubber spatula, spoon, or knife to gently push the edges of the cookie to your liking! Make sure to do this while the cookies are still warm.
Let cool on pan for about 5-10 minutes, then transfer cookies to wire rack. Let cool completely.
You can a piping bag, toothpick, or cookie scribe to add on the details. I used a toothpick.
Use melted milk or dark chocolate to create the eyes, and mouth. Let eyes dry before continuing.
Use melted white chocolate to add the whites of Kirby's eyes. Split half of the melted white chocolate into another bowl, since you will dying the white chocolate half blue and the other half pink/red.
Add oil-based blue food coloring to the melted white chocolate. If you don't have oil-based food coloring, then the chocolate will seize/become lumpy. To counter this, stir in a tsp of neutral oil (canola, vegetable) at a time, until it becomes smooth again. Use this to add the blue details to Kirby's eyes.
To the rest of the white chocolate, add oil-based pink/red food coloring. Use this to draw on the blush.