 Sort ingredients
 dorkstho
 QR Code
 Listen
 Pdf
Pdf
Although this recipe looks long and complex, it’s quite simple to make. There’s a lot of info in here on getting the best results, which after making this once, you’ll already be aware of and will make this recipe even easier to make! Let’s begin!
Add flour, sugar (optional) and salt into a medium sized bowl and mix together using a whisk.
Add the chilled butter. Use your hands to rub into the flour until the mixture has different sized flat pieces of flour coated butter. The key here is to work quickly and not overwork the dough. This will overwork the gluten causing the crust to shrink when you bake it.
Add 4 tbsp of the iced water mixture into the flour mixture and work it into the dough. If you can squeeze some of the dough mixture in your hand and it comes together without crumbling, it’s ready to go in the fridge. If it’s still too crumbly, add another tablespoon of iced water until it forms a dough when squeezed.
Pour the crumbly mixture onto your work bench. Bunch the dough together to form a disc. Don’t knead it. It looks crumbly right now but it will come together as it rests in the fridge. Cut into 2 pieces and form into discs again. Wrap in plastic wrap. Chill in the fridge for 2 hours.
Add the flour, sugar (optional) and salt into the bowl of a food processor and pulse to combine. Then add half of the cold butter and pulse (about 19 - 20 times) until the butter is the size of lentils. Add the remaining butter and pulse 2-3 times until the butter resembles blueberry sized pieces. Add 4 tbsp of iced water mixture while pulsing the mixer. Same deal here, if you can squeeze some of the dough mixture in your hand and it comes together without crumbling, it’s ready to go in the fridge. If it’s still too crumbly, add another tablespoon of iced water until it forms a dough when squeezed.
For this recipe you can either use a 9-inch, deep glass or metal pie plate or a 9-inch, deep tart tin with removable bottom. If you’re using a tart tin with removable bottom, you’ll need to place it on a baking tray when baking.
Once your dough has chilled take it out of the fridge and unwrap it. Allow it to rest at room temperature for 10 minutes. Sprinkle flour on your work bench and use a rolling pin to slowly roll out the dough. If cracks form around the edges, pinch them together. Continue flipping the dough over and around as you roll it to ensure it’s all one even thickness. This will also help it roll out round. You want to roll it to about a ½ cm / ¼-inch thickness. If you start to notice your dough is rolling to an odd shape, carefully tear off the odd bits and pinch onto a part that needs dough to form a more round disc shape.
Sprinkle your rolling pin with a little flour and carefully drape the pastry dough over it to help you transfer it over your pie or tart tin.
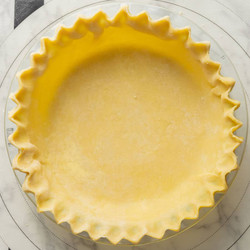
Carefully lift the edges and allow them to naturally fall into the edge and bottom of your tin. Do not stretch the dough to the bottom. It will cause your pie crust to shrink as it bakes. Cut off or fold the excess pie dough at the top leaving just a little bit of excess to go above the height of your pie tin. Press a fork around the top edges to crinkle the dough or use your thumb and fingers to form waves for a classic look. If using a tart tin, simply use a sharp knife to cut away excess pie dough.
Place your pie in the freezer for 10-15 minutes. This will allow it to bake even flakier!
Preheat a fan-forced oven to 170C / 325F.
Once frozen solid, take out of the freezer. To prevent your pie crust from bubbling up and causing an uneven bottom while baking you need to blind bake your pie crust first. This involves adding weights in the pie crust and baking it for a little bit before baking it without.
Place some baking paper on the inside of your frozen pie crust. Add another layer of foil wrap on the inside and place it tightly around the inside of the baking paper. Fill it with baking beads or dried beans like red beans or chickpeas. Bake for 15 minutes or until edges are golden.
Once baked, take out of the oven, carefully lift out baking paper from the corners and bake for a further 5 minutes until golden. Allow to cool for 15 minutes before filling.
Take the pie crust out of the oven and carefully lift the pie crust. Let your beads or beans cool completely before storing them in a container or zip lock back to use again. Brush the bottom and sides of the pie crust with egg wash. Egg wash can be made by whisking an egg and milk together. This will help seal up your pie crust to prevent wet fillings from leaking through the pie crust making it soggy. It will also give your pie a golden, glossy look once baked. Use a fork to prick holes in the bottom of your pie crust. Bake for a further 15 minutes or until golden.