 Sort ingredients
 drlizprince
 QR Code
 Listen
 Pdf
Pdf
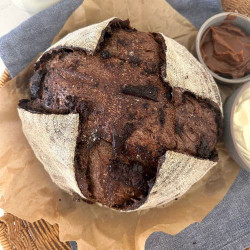
Autolyse - Premixing The Dough: Weigh out your sourdough starter, sugar, cocoa powder and water into a large ceramic or glass bowl. Mix these together until they are all dissolved in the water. Then add your flour (and dark malt powder if you are going to use it) and salt and mix whole lot together to form a shaggy dough. Cover your bowl with cling film or a damp tea towel and let it sit for around 1 hour.
Forming Up The Dough: After the dough has been through autolyse you need to bring it together into a ball. Work your way around the bowl, grabbing the dough from the outside, stretching it up and over itself, into the centre, until a smooth ball is formed. You shouldn't need more than about 20-30 stretches to form the ball. Once the dough has formed into a smooth ball, pop the cling film back on and let it rest for 30 minutes.
Stretch & Fold - Creating Structure: Over the next few hours you need to create some structure for your dough by 'stretching and folding'. Aim to do around 4-6 sets of stretches and folds. For each set, stretch the dough up and over itself 4 times. Leave around 15 minutes in between each set.
Bulk Ferment: Once you've finished your stretch and folds, place the cling film or damp tea towel back over your dough and let it rest and ferment at room temperature. You want the dough to double.
Shaping The Dough: Once your dough has finished its first ferment, it's time to shape it and add the chopped chocolate. Use a dough scraper to gently ease the dough out of the bowl. You want it to land upside down on your counter so that the smooth top of the dough is on the countertop and the sticky underside is facing up. Before you shape the dough, pull it out into a rough rectangle. Sprinkle some of chopped chocolate over the dough. As you shape it into a batard or boule, keep sprinkling the chocolate on every fold.
Placing Into A Banneton: Once the dough is shaped, place it into your banneton smooth side down, so your seam is on the top. Cover it loosely with a plastic bag or damp tea towel and place into the fridge.
Cold Ferment: Try to leave it in the fridge for a minimum 5 hours up to a maximum of around 36 hours.
Preparing To Bake: Preheat your oven to 230C/450F. Place your Dutch Oven into the oven when you turn it on so it gets HOT. Leave your dough in the fridge until the very last minute.
Bake Time: When your oven is at temperature, take your sourdough out of the fridge. Gently place it onto a piece of baking paper. Gently score your bread with a lame, clean razor blade or knife. Carefully take your dutch oven out of the oven. Place the sourdough into the pot using the baking paper as a handle. Put the lid on and place into the hot oven. BAKE TIME: 30 Minutes with the lid on at 230C/450F plus 10-15 Minutes with the lid off at 210C/410F.
Finishing The Bake: When you remove your dough from the oven, carefully remove it from the dutch oven as soon as possible and place on a wire rack to cool.