 Sort ingredients
 carolyn70
 QR Code
 Listen
 Pdf
Pdf
Put all the ingredients for the syrup into a small saucepan.
Crush the raspberries slightly against the side of the pan with the back of a spoon to release some of the juice.
Bring to a boil over a medium heat, stirring frequently.
Once boiling, turn down to a simmer for 2 to 3 minutes, stirring intermittently.
Remove from the heat and leave to cool.
Once cool, push the fruit mix through a sieve so that you are left with a thick syrup.
Discard the pips and fibre left in the sieve.
Refrigerate the syrup until ready to use.
Mix 50 ml of the coconut milk with the arrowroot powder in a small bowl to make a smooth paste.
Pour the rest of the coconut milk into a large saucepan with the maple syrup and bring to the boil, stirring.
When the liquid reaches boiling point, pour in the arrowroot paste and continue to stir until the custard thickens.
Remove from the heat and stir in the vanilla and white chocolate until the chocolate has melted and the custard is smooth.
Cool the custard (stirring intermittently to prevent a skin forming) and then place in the fridge to completely chill for a few hours.
Completely line an 8 inch/20 cm cake tin with baking paper and place in the freezer to chill before you churn the ice cream.
Churn the ice cream batter in an ice cream maker by the manufacturer’s instructions (or by hand as instructed in NOTES below).
Once churned, turn off the machine and add the raspberry syrup.
Gently swirl through the ice cream with a knife blade to get a ripple effect.
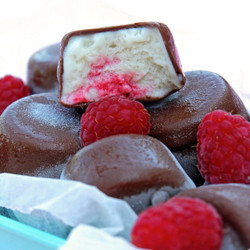
Spoon the ice cream into the chilled trays, level off with a spatula and place in the freezer (over night and preferably on fast freeze) to harden as much as possible before you coat with chocolate.
Prepare a quantity of Magic Chocolate as in the separate recipe card attached to this post.
Make sure the ice cream is as cold and hard as possible before removing from the tin.
For a large slab of ice cream, cut into even portion-sized squares or rectangles with a very sharp knife.
When ready to coat the ice cream portions with Magic Chocolate, prepare the bowl for dipping (as deep as possible).
For small ice cream bites, you should be able to cover completely in one dip.
Insert a cocktail stick into each ice cream piece before dipping, to allow for coating evenly without holding the ice cream.
For larger ice cream bars, either dip one half at a time (holding with tongs) and allow the chocolate on one half to harden before turning over and dipping the other half.
The chocolate should harden very quickly on contact with the ice cream.
As it sets, place on a tray (that fits in the freezer) lined with baking paper and put back in the freezer to re-harden as soon as possible.
When the chocolate-coated ice cream bites have had time to harden again in the freezer, carefully remove any cocktail sticks with a gentle twisting action and store in airtight containers in the freezer.