Heat a frying pan over a medium heat.
Add the olive oil and chopped shallots. Season with salt and cook the shallots with occasional stirring until they've softened and caramelised. This should take about 5-10 minutes. Adjust the heat as necessary.
Once the shallots have caramelised, add the Swiss chard (or spinach) and cover the pan with a lid. Cook over medium heat with occasional stirring until the chard has fully wilted. Uncover the pan and cook for a further 1-2 minutes until most of the moisture released by the chard has evaporated.
Transfer to a large bowl and allow to cool completely to room temperature.
Once cooled, add the cream cheese, coarsely grated cheddar, salt and pepper, and mix well until evenly combined. Make sure to taste the filling and adjust the seasoning. Set aside until needed.
You can make the dough by hand or using a stand mixer fitted with the dough hook attachment.
Make the psyllium gel: In a bowl, mix together the psyllium husk and lukewarm water. After about 30-45 seconds, a gel will form.
In a separate large bowl (or the bowl of a stand mixer, if using), whisk together the millet flour, tapioca starch, sugar and salt.
Add the olive oil to the psyllium gel and mix well to combine, then add them to the dry ingredients.
Knead everything together into a smooth, supple dough that comes away from the sides of the bowl (it shouldn't be too sticky to the touch). Scrape the sides and bottom of the bowl as necessary, to avoid any patches of dry flour.
See the blog post for detailed step-by-step photos of the assembling process.
Turn out the dough onto a lightly floured surface and divide it into 4 equal portions. You can use a scale to make sure that they’re all of equal weight (each portion should weigh about 122g) or you can just eyeball it.
Shape the pieces of dough into balls and cover them with a clean tea towel, to prevent them from drying out.
On a lightly floured surface, roll out a dough ball into a large oval, about 8x12 inches (20x30cm) in size. It’ll be fairly thin, about 1-2mm.
Use your fingertips to wet the edge of one half of the oval with a bit of water (this will help to seal the stuffed flatbread and prevent the filling from leaking out during cooking).
Place one quarter of the filling onto one half of the oval (the one with the wetted edge). Use your hands, the back of a spoon or a small offset spatula to spread out the filling evenly over half of the oval, leaving about ½-inch (1-1.5cm) edge free of the filling.
Fold the other half of the oval over the filling. Gently pat the top to press out any trapped air and then press down with your fingertips along the edges to create a good seal.
Repeat with the rest of the dough balls and filling. Keep the shaped flatbreads covered with a tea towel to prevent them from drying out.
Heat a large skillet or pan over medium heat and, once hot, add about 1 tablespoon of olive oil. (You can adjust the heat as needed during the cooking process, depending on how quickly your flatbread browns.)
Place the flatbread into the skillet and cook it over medium heat for about 2-3 minutes or until it’s deep golden brown underneath.
Flip it and cook it for 2-3 minutes on the other side or until it’s nicely browned underneath. The flatbread will want to puff up because of the trapped steam – use a spatula to gently press down on it, to achieve a more even browning.
Flip it again and cook for about 1 minute, to get both sides perfectly crisp.
Transfer the cooked flatbread to a wire rack, then repeat the cooking process with the remaining flatbreads.
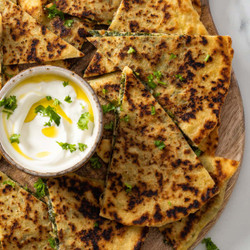
For maximum crispness, eat the flatbread straight away while it’s still hot. Slice them into easy to grab wedges, and serve them with some yoghurt for dipping.
You can also allow them to cool until lukewarm or at room temperature – but note that they won’t be as crisp. However, the flavour of the filling is actually more intense if you serve the flatbread at room temperature.
This gluten free stuffed flatbread is definitely at its best fresh, on the day of preparation, but it also keeps really well until the next day in a closed container in the fridge.The next day, you can reheat it in a hot pan: just cook it over medium to medium-high heat for 4-5 minutes, flipping it occasionally. That will actually make it even crisper than it was on day one!
