 Sort ingredients
 corbet
 QR Code
 Listen
 Pdf
Pdf
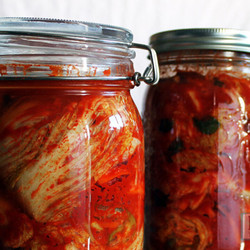
After trimming the end(s) of your cabbage, cut crosswise into the bottom 2 - 3 inches. Pull apart from the cut to create two halves of cabbage. Make a cut on the bottom of each half and pull apart to create quarters. Remove any discoloured parts and rinse each section.
Layer the salt between each of the leaves. Pack the salted sections into a container and let sit for 2 hours. During this time, the leaves will leech water and create a brine. Turn the sections every 30 minutes so that all the leaves become saturated with the brine.
While the cabbage is sitting, combine the hot water, shiitake mushroom and wakame and set aside to rehydrate.
Peel and chop the daikon and carrot into matchsticks. You can chop the scallions into lengths as short or long as you like. Place in a large mixing bowl and set aside.
Combine the garlic, onion, and ginger in a blender or food processor and process to a puree. Set aside.
Strain the wakame and shiitake and save the water. It will have a strong 'sea' smell. Discard the wakame but mince the shiitake finely and add to the bowl of matchstick vegetables.
To make 'fish' sauce, add soy sauce and salt to the 'sea' water.
To make the slurry, add rice flour to the 'fish' sauce and whisk until no lumps remain. Microwave for 3 minutes, stirring every 30 seconds. Alternatively, bring to a boil on the stove and let cool. The result should be thick and gravy-like.
Using gloves to protect your hands, add the garlic puree, 'fish' sauce slurry, and gochugaru to the matchstick vegetables and shiitake and mix very well. Everything will turn bright red. You can taste now to gauge the spicy heat, remember that you will be adding in the cabbage later so it will be spicier now than in the finished product.
After sitting for two hours, the cabbage should be shrunken and flexible. Rinse the sections thoroughly to remove excess salt. Squeeze excess water from the cabbage and set on a plate.
For smaller sections of finished kimchi, cut into the stem of each large section and pull apart to create thinner sections. Alternatively, you may choose to leave them intact, cut away the bottom to separate the leaves, or cut across the sections to create bite sized pieces.
Using gloves again, apply the red mixture to each leaf and massage thoroughly. As you do this, stuff the vegetables in between the leaves of each section. Once stuffed, roll up each section and place in a clean container (I prefer glass jars). If you are making bite sized pieces, simply mix in thoroughly and stuff into jars. Press down on each section/handful as you place it in the jar(s) to reduce any air pockets.
Cover the jar(s) and let ferment at room temperature in a dark place. As fermentation occurs, gases will develop so make sure the lid is loose enough to let this escape. Over time, more water will leech from the vegetables making the kimchi look liquidy. Check the kimchi after 24 - 36 hours. When the kimchi is ready there will be lots of liquid in the jars that bubble up when the kimchi is disturbed. The taste will be tangy and savory; if it still tastes fresh it's not ready. You can let the kimchi sit at room temperature a bit longer to develop a more acidic kimchi.
When your kimchi is ready, you can use it right away or store in the fridge. It should keep for a month or more. The cold will slow the fermentation process but not halt it. Over time, the kimchi will get more and more sour (acidic). Since fermentation is still going on in the fridge, open the jars to release gas every week to prevent too much pressure build up.