Read this recipe first - Take a minute to read the full recipe before starting. It’ll help you plan your prep, understand what each step should look like, and avoid surprises once you get going. It’s especially important with recipes like this where timing, texture and technique matter.
Preparing your oven - Preheat your oven to 130C / 265F (fan off). Place the rack in the middle of the oven. I only tested this recipe with the oven fan switched off. Fan off is best for a bright white pavlova.
Prepare your baking tray - Line a large baking tray with baking paper. Use a 20cm / 8-inch plate or bowl to trace a circle onto the paper with a pen. Flip the paper over so the ink side faces down. Set aside.
Clean your mixing bowl - Pour ½ tsp of white vinegar or lemon juice into a large heatproof glass or metal bowl. Use a paper towel to wipe the entire inside. This removes any fat or residue that could stop your meringue from whipping properly.
To separate your eggs - Separate the eggs one by one in a small bowl, adding them to the large mixing bowl as you crack each one. The key here is to not get any egg yolks in the whites, even a speck can prevent your egg whites from whipping up.
Froth up your egg whites (3 min) - Add 180g egg whites to your mixing bowl. Whip on low speed for 5 minutes. I use speed 3 on a 7-speed hand mixer. You’re aiming for soft peaks and small, tight bubbles.
Adding the sugar (5 min aprox) - Turn your mixer to speed 3. Add the sugar 1 tsp at a time, waiting 8-10 seconds between each spoonful. It’ll take about 5 minutes to add all the sugar.
Continue whisking (8-10 min aprox) - Once all the sugar is in, stop the mixer and use a spatula to scrape down the bowl to catch any unmixed sugar on the sides of the bowl. This slow mix gives the sugar time to dissolve and helps build a stable meringue. Put the mixer back up to speed 3 and beat for 8 minutes. Stop the mixer and rub a bit of meringue between your fingers. If it feels gritty (sugar granules haven’t dissolved), beat for 2 more minutes. The meringue will be thick, glossy and smooth.
To finish your meringue (1 min) - Sift in the corn starch and cream of tartar (I like mixing them in a little bowl first), then add the vanilla bean paste or extract. Mix on low speed, then increase to speed 2 and mix for 30 seconds until fully combined. The meringue should be glossy and thick with stiff peaks that curve slightly at the tip when you lift the beaters upside down.
To finish prepping your baking tray - Dab a little meringue in each corner of the tray and press the baking paper down (marker side facing down) so it stays in place while shaping.
To shape your pavlova - Spoon your meringue into the center of your circle and spread it into a neat cake shape using a rubber spatula or offset spatula. Keep the top flat, the sides slightly sloped, and the base just a little wider than the top with smooth, defined edges. TIP: Avoid overworking it so it stays light and doesn’t dry out.
Create a center dip - Use the same tool to press a shallow bowl shape into the center of the pavlova, leaving about a 3cm gap between the edge of the dip and the pavlova's outer edge. Smooth any excess meringue back around the sides to keep it even, or scrape it off and return it to the bowl.
Create ridges (structure) - Starting at the base, sweep your spatula upward in a straight line. As you reach the top edge, gently round it out before smoothing onto the flat top, stopping at the edge of the center dip. Do this all around the pavlova. This curved motion helps create ridges which helps build a strong outer shell that supports the pavlova while it bakes and reduces the chance of sinking. Some cracking will happen. That will be covered up with cream. If it sinks a little right at the top, that’s ok.
Baking your pavlova
To bake - Place the meringue on the middle rack of your oven and immediately lower the oven to 95C / 200F (fan off). Bake for 90 min.
Prepare mascarpone cheese - Add the mascarpone to a large mixing bowl (glass or metal) and use a spatula to stir and break up as some brands can be firmer than others. This helps break it up a little to prevent lumps in your whipped cream.
Whip remaining ingredients - Add the cold heavy cream, powdered sugar and vanilla to the mascarpone. You can use an electric hand mixer or a stand mixer with a whisk attachment, but I actually find it easier to get the right texture with a hand whisk. You’re aiming for a smooth, stiff whipped cream that holds its shape but still looks silky. If it looks split or grainy, it’s been overwhipped.
Cut out circle - use a small sharp knife to slowly and carefully score a circle on top of the pavlova on the outer edges of where the dip was. Keep gently scoring until the meringue shall collapses and falls down. This will stop the top from collapsing when you fill the pav!
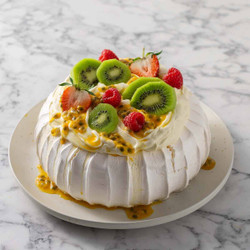
Add the toppings (right before serving) - Add the cream on top, spread it around and then add the berries and fruit before serving.