 Sort ingredients
 motherburn
 QR Code
 Listen
 Pdf
Pdf
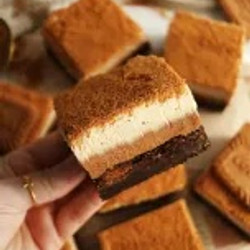
Preheat the oven to 180℃ fan, and line a 8 x 8 inch square / loose base tin with grease proof paper. Allow the paper to hang over the edges of the tin, this makes it easier for removing the bars when ready.
Sift the cocoa powder and flour together in a medium bowl.
Fill a small saucepan ¼ full with water and place on the hob over medium heat. Add the dairy-free chocolate and butter into a heat proof bowl. Place the bowl over the pan, creating a bain-marie. Allow the chocolate and butter to melt together, stirring with a heat proof spatula. Remove from the heat and allow to cool for a few minutes while you make prepare the aquafaba.
Add the aquafaba and sugar into a medium sized mixing bowl and whip up on high speed for around 5 minutes until thick and glossy. I use a stand mixer with balloon whisk attachment. A electric hand whisk will work great too. Whip on high speed, the aquafaba mixture should be thick enough that when it drips into the bowl, the mixture should ribbon off the mixer.
Pour the chocolate and butter mixture over the aquafaba, and carefully fold together with a spatula. Make sure to be very gentle with this step as you want to keep as much air in the mixture as possible.
Once combined, sift in the flour and cocoa powder. Again, fold this in with a spatula until a rich and thick brownie batter forms.
Fold in the roughly chopped Biscoff biscuits.
Pour the brownie batter into the lined tin and level off with an off-set spatula.
Place the tin into the middle of the oven and bake for 30-35 minutes. If you want a more fudgey brownie, you may want to underbake by 5 minutes!
Once baked, remove the tin from the oven and allow to cool fully on a wire rack. TIP: Keep the brownie in the tin while it’s cooling. This will help it keeps it’s shape and will also lock in some of the moisture, which will help with the chewy texture.
Keep the brownie in the tin as we will be layering the spread and cream in the tin.
In a small saucepan, add in the Biscoff spread. Heat on low until melted. It can burn very fast if left, so be sure to keep an eye on it, using a heat proof spatula to keep it moving until fully melted. Optional, you can met it in the microwave in 20 second intervals.
Once the brownie is cool to the tough, pour over the melted Biscoff spread, use a off-set sapatula to spread it around to cover the entire brownie in an even layer.
Place in the fridge to set. This will take around an hour or 2.
Add all of the mascarpone cream ingredients into a high speed blender. Blend on high until super smooth. You may need to stop and scrape the blender down a few tines with a spatula to ensure everything gets incorporated.
Once super smooth, pour over the set biscoff spread in an even layer, use the back of a spoon or off-set spatula to spread the cream into the corners of the tin making sure its as flat as possible. You can even tap the tin on your worktop a few times to remove any excess air bubbles.
Blitz some Biscoff biscuits in a small food processor or bash them in a clean tea towel with a rolling pin until crumb like. Cover the entire brownie in a layer of the crumbs. The cream will make it stick.
Place into the fridge overnight to set. The cream will firm up when it’s chilled.
Once the cream feels firm / creamy, use a sharp knife to score the edges of the tin to help the brownie slide out.
Use the push base of the tin to push the brownie out of the tin and place on a chopping board.
Use a sharp knife to carefully cut the brownie into squares. TIP: Wipe the knife clean after each cut to keep each brownie neat and tidy.
Serve and enjoy!