For the Chocolate Wafers: Adjust oven rack to middle position. Preheat the oven to 350°F (175℃) and line 2 rimmed baking sheets with parchment paper; set aside. With a hand mixer or stand mixer fitted with a paddle attachment, cream butter, granulated sugar, brown sugar, vanilla, espresso powder, salt, baking powder, and baking soda on medium speed until light and fluffy, about 2 minutes.
With the mixer on medium speed, add the yolks one at a time, beating until just combined after each addition; scrape down sides of bowl, as needed.
Once all yolks are incorporated, reduce mixing speed to low and add flour and cocoa and mix until all dry ingredients are incorporated, 1 to 2 minutes. With the mixer on low speed, slowly drizzle in coffee, stopping mixer and scraping down the bowl about halfway through, until fully incorporated and mixture has a smooth cake-batter–like consistency, 1 to 2 minutes. (If any lumps remain, increase the mixer speed to medium and beat until only a few small lumps remain. Any remaining small lumps will disappear during baking.)
Divide the batter evenly between the two prepared baking sheets (about 15 ounces of batter per sheet). Use an offset spatula or the back of a spoon to spread the batter into a thin even layer; it’s okay if the batter does not reach to the corners of the pans, baked wafers will later be cut into an about 9-inch by 13-inch rectangle. Tap the baking sheets against the counter to help level the batter. Bake one sheet at a time until the wafer is puffed and firm to the touch, 7 to 10 minutes. Let cool to room temperature on a wire rack, about 30 minutes. Refrigerate or freeze, uncovered, until fully cooled and firm, about 30 minutes.
Meanwhile, If using store bought ice cream, soften the ice cream in the refrigerator until spreadable, about 30 minutes. Line a 9-inch by 13-inch baking pan with parchment paper. The paper should overhang the long sides of the pan by about 4 inches.
Cut the cooled chocolate wafers into 8 ¾-inch by 12 ¾-inch rectangles. Reserve the excess scraps.
Carefully transfer one cut wafer, shiny side down, into the bottom of the prepared pan. Gently press and fit the wafer into the pan then slowly peel off the parchment paper stuck to the bottom. (If the wafer cracks or breaks, use some of the reserved wafer trimmings to patch together. The wafers should meld together nicely just by pressing firmly.) Store the wafer-lined pan and the remaining chocolate wafer separately in the freezer until ready to use.
Once the ice cream is softened, spread over the wafer that is nestled in the prepared pan. Use a spoon or offset spatula to spread the ice cream into an even layer, pushing into the corners of the pan (for best results with homemade ice cream, use it immediately after it's finished churning in your ice cream maker).
Invert the remaining cut wafer onto a cutting board. Peel off the parchment paper and place the wafer shiny side up on top of the ice cream. Cover the wafer with a piece of parchment or plastic wrap, then use your hands to gently press the top wafer down and seal it against the ice cream. If you notice there are any thin or uneven places, gently push on the chocolate wafer to redistribute the ice cream below. Freeze the uncut ice cream sandwiches in the pan, covered with plastic wrap, until the ice cream is frozen, about 12 hours before proceeding.
Once fully frozen and ready to cut, run a knife under hot water to warm slightly then run the warmed knife around the edges of the pan to loosen. Hold the overhanging parchment to gently lift the uncut ice cream sandwich from the pan. It may take a bit of tugging on one side of the parchment, then the other to remove. Transfer to a cutting board.
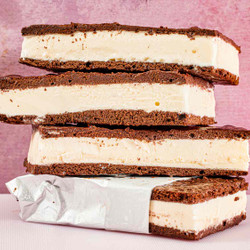
Using a large chef's knife, cut it into twelve 4 ¼-inch by 2 ½-inch rectangles by first cutting it into quarters, then cut each quarter into three equal sized pieces. For clean slices, wipe the knife clean with a hot, wet towel between each cut. Serve immediately or freeze the sandwiches in an airtight container or wrap each in your own prepared waxed foil (see note).
