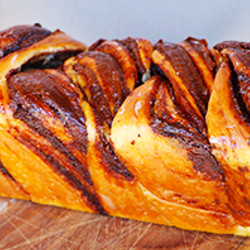
Chocolate Babka starts with a homemade brioche base. To start making the dough, add the buttermilk, egg yolk and whole egg to the bowl of a stand mixer, along with all dry ingredients and mix at a medium speed using the hook attachment.
After a few minutes, remove the bowl from the mixer and fold the dough over a few times using a spatula, scraping any excess from the sides and continuing to incorporate it.
The chocolate babka dough will need to mix until the dough starts to pull away from the sides of the bowl.
Once it is developed add the soft butter, a teaspoon at a time, (while the mixer is still on) and continue mixing until it has combined well.
At this point, if ready, the dough should be shiny, feel a little elastic and have come completely away from the sides of your mixing bowl.
Next, using a spatula and being very gentle transfer your dough into a lightly greased container with the lid on.
Refrigerate overnight to encourage a long, slow fermentation for maximum flavor.
Sprinkle some flour over your bench and carefully tip out the dough from the container without folding or kneading it. The dough should be firm to the touch as the butter has solidified in the fridge.
After resting, sprinkle flour over your bench top/board and dust the top of the dough with a generous amount of flour (too) then press down using the tips of your fingers to start to flatten it.
Slowly start to roll the dough using a rolling pin with nice even pressure back and forth – move in this motion only.
Once the chocolate babka dough starts to flatten, turn it clockwise and roll a few more times, repeating until you pin the dough out to 30cm x 30cm square ((11.8in x 11.8in).
Spread thick Nutella over the top of the dough leaving a border around the edges. If you don’t like Nutella, you can choose other toppings and add them in – chocolate chips, candied fruits, whatever you like!
Starting from the bottom and working your way up, begin to roll the dough bit by bit using both hands until you create a large log.
Keep the sides of your chocolate babka log in and once you get to the end, pinch the dough at the bottom and roll it over (this will help it stick together). The log should be nice and even.
Next put the dough on a floured tray and place it in the fridge for 20 minutes.
After this time, flour your bench once again and place the chocolate babka dough down with one end facing you.
Using a serrated bread knife, gently cut directly down the middle and then separate into 2 halves using a pastry cutter.
Place one half on its side, with the Nutella facing up and the other piece over the top on an angle so it creates an X.
Now twist one side over the other, always making sure the chocolate side is always facing up.
Do it a few times until the two meet completely and pinch each end so it comes together well.
Using a 20cm/7.87inch cake loaf tin cut 2 pieces of baking paper so you can layer them each way across the tin.
Place the babka loaf in the tin ensuring it is pressed in well. You can use the pastry cutter to help scoop it up quickly too if it helps!
Cover the chocolate babka and tin all the way around using plastic wrap and leave to proof for 1hr.
After this time, remove the plastic wrap and cover with foil, placing it into the oven at 170°C/338°F for 20 minutes.
Remove the foil and cook for another 10 minutes to brown up the crust.
While the chocolate babka is baking, mix together ½ cup white sugar and ½ cup water in a small saucepan.
Place on the stove at a medium heat and leave to boil. Once it boils, simmer for a further 5 minutes until it becomes “syrup-like” in texture. Turn off the stove and leave to cool.
Once the babka is ready, brush the syrup over the top and leave to rest for 5-10 minutes.
Now pull the chocolate babka out of the tin using the baking paper to lift it up and leave to cool for 1hr.
E ora si mangia, Vincenzo’s Plate….Enjoy!
