You can prepare the dough using a stand mixer fitted with the dough hook attachment or by hand.
Make the psyllium gel: In a bowl, mix together the psyllium husk and lukewarm water. After about 30-45 seconds, a gel will form.
In a large bowl or the bowl of a stand mixer (if using), whisk together the millet flour, tapioca starch, sorghum flour, sugar, instant yeast and salt.Tip: If using active dry yeast instead, you need to activate it first. Mix it together with the sugar and 120g (½ cup) of the water listed in the recipe (note that that means you'll use less water to make the psyllium gel). Set aside for 5-10 minutes, or until the mixture starts frothing. Then, add it to the dry ingredients along with the rest of the wet ingredients.
Add the olive oil and vinegar to the psyllium gel, and mix well to combine.
Make a well in the middle of the dry ingredients and add the psyllium gel-oil-vinegar mixture.
Knead the dough until it's smooth and all the ingredients are evenly incorporated. Use a rubber spatula to occasionally scrape along the sides and bottom of the bowl to prevent any dry patches of unmixed flour.The final dough should be smooth, supple and fairly soft, with no lumps of un-mixed flour or psyllium gel. It will be fairly sticky to the touch, but resist the temptation to add more flour to it, as that can make your focaccia too dense and dry.
Line a quarter sheet pan (a 9½x13-inch/24x33cm rectangular baking pan) or another similarly sized pan with parchment/baking paper and grease it with 1-1½ tablespoons of olive oil. Tip: Lining the baking pan with parchment/baking paper and then greasing the paper itself with plenty of olive oil ensures that your focaccia won’t stick to the pan.
Transfer the dough into the prepared baking pan and, with lightly oiled hands, press and squish it down so that it completely fills the baking pan, all the way to the edges and into the corners. Make sure that the dough forms a fairly even layer in the pan. Don't worry if it's not perfectly smooth, any imperfections won't be noticeable after proofing – and focaccia is meant to be rustic!
Lightly cover the focaccia with a sheet of plastic wrap/cling film (to prevent it from drying out) and proof in a warm spot until doubled in size, this should take about 1 hour. Once proofed, the focaccia should be noticeably puffy and its thickness in the baking pan should double.Tip: If your kitchen is on the cold side, put a cup of boiling hot water into your (turned-off) oven – that will create the perfect warm, slightly humid proofing environment.
Place a baking steel, a baking stone or a large heavy-duty baking sheet on the lowest oven rack and preheat the oven to 425ºF (220ºC). Make sure to thoroughly preheat your oven, start preheating it after your focaccia has been proofing for about 15 minutes. Tip: Baking the focaccia on the lowest oven rack, on a preheated baking steel (or baking stone or heavy-duty baking sheet) ensures that it'll be perfectly baked through with a crisp bottom, without browning too much on top.
Once your focaccia has doubled in size, drizzle it with 2 tablespoons of olive oil and use your fingers to dimple it all over. To do this, shape your hands like claws and push your fingers deep into the dough, all the way through to the base of the pan (see blog post for photos) – your dough will deflate a bit, but that's OK!
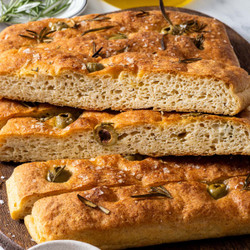
Press the olives into the dough, spacing them out evenly across the focaccia, and sprinkle with rosemary and flaky sea salt.
Place the focaccia onto the preheated baking steel (or baking stone or heavy-duty baking sheet) and bake at 425ºF (220ºC) for 40-45 minutes, or until it's deep golden brown on top.
Immediately after you've taken it out of the oven, remove the focaccia from the baking pan onto a wire cooling rack (remove the parchment/baking paper underneath as well) and allow it to cool until warm or at room temperature before serving.It's very important that you allow the focaccia to cool until warm or at room temperature before you cut into it. The crumb needs some time to properly set and if you cut into it straight away, while it’s still piping hot, you’ll find the crumb rather sticky.Tip: Cooling the focaccia on the wire rack allows air circulation, which prevents condensation build-up – this ensures that your focaccia will be beautifully crisp all over.
This gluten free focaccia is definitely at its very best fresh, on the day of baking. However, it keeps very well in a closed container until the next day, you just need to reheat it in a 400ºF (200ºC) oven for about 10 minutes before serving.Reheating has two functions: it re-softens the interior and it also crispens up the crust (as it tends to soften overnight) – and the reheated focaccia is just as delicious as the freshly baked one.
