 Sort ingredients
 misssweetviolet
 QR Code
 Listen
 Pdf

Preheat your oven to 350°F
In the bowl of your mixer or large mixing bowl, cream butter and sugars until light and fluffy. Beat in the egg, vanilla, and almond extract until just combined. Now add baking powder, salt, and cream of tartar, and mix for 2 minutes
Add flour, mix until just combined enough that no flour streaks are left.
Roll the dough till about ¼ inch thick and cut into desired shapes with cookie cutters. Place about ¾ inch apart on the baking sheet. Bake for 7-9 minutes. Cool on the cookie sheet for at least 5 minutes before moving to a cooling rack.
Make your cookie dough.
Divide the dough, take about ⅓ -¼ of it, and set it aside.
Roll the remaining dough (⅔ - ¾ of the dough) into a rectangle on a sheet of parchment. Make sure it is about half an inch thick. This is going to be your canvas. Set aside.
Dye the remaining dough into the colors you will need for your design. I like to place pieces of dough by the coloring, so I make sure I have enough, giving me a visual of the color combination. YOu don't need to dye large portions of the dough because you will roll this dough out smaller, and it won't need to cover the entire cookie canvas. If you are using liquid dye, it is a good idea to have a bit of flour on hand to sprinkle on if your dough gets too sticky. I find this dough is great at taking on a little extra moisture.
Once the dough is dyed, it is time to start cutting out the shapes you will need for your design. Roll out the colored dough to about ¼ of an inch thick. I like to make all the shapes I will be using before I start placing them on my cookie canvas. Try to be creative with this. For example, just one part of a cookie cutter might be what you need. I used the bunny ears on a cookie cutter to make petal shapes. Make the shapes smaller than you want on your cookie because they will get stretched out once you roll them all together. Mini cookie cutter shapes, fondant cutters, or clay cutters work great for this kind of cookie. However, I did get some polymer clay cutters that aren't technically food safe and was advised to use plastic wrap over what I was cutting to ensure they didn't have direct contact.
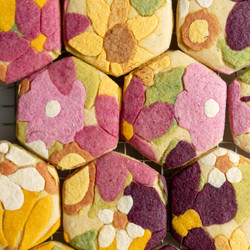
When all your shapes are ready, it is time to start building your masterpiece. If you are adding some backdrop to your cookies (like a check pattern), start with that. Then I like to do my leaves if there are any. I do all the same shapes at once and distribute them evenly on the cookie canvas. I like the look of them not all being perfect but do what suits you.
You have to lay the cutout dough on top and don't need to press it in at all, and this helps move things around until you like the design.
Cover your design with another clean piece of parchment. Using a rolling pin, roll the dough until it reaches your desired thickness. Make sure you roll the dough in all directions to spread your design evenly.
Using a bigger cookie cutter, cut out your cookies, place them on a baking sheet and bake for 7-9 minutes, letting them cool on the baking sheet for 5 minutes before transferring to a cooling rack.
Please take all the scraps of dough left over and roll them together, and cut them out as well. They make a fun cookie on their own, and nothing goes to waste.
If you want to make sandwich cookies, fill cooled cookies with your favorite buttercream and enjoy!