This step will need to be done the day before you bake & decorate your cake!
If you are using fresh strawberries (not already frozen), wash them well, cut the tops off, and place them in an air-tight freezer bag or container in the freezer overnight. If you are using already-frozen strawberries, you can skip this step.
Place your frozen strawberries in the refrigerator to completely thaw. This will result in squishy/juicy strawberries which will make for the perfect filling. I know this sounds weird, but trust me, this texture is exactly what you want! There will also be a decent amount of juice left in the bag after your strawberries have thawed and that is completely okay!
Once your frozen strawberries have thawed, dice them and place them into a bowl. Keep half of the juice that came from thawing the strawberries and mix it into your bowl of diced strawberries.
Cover your bowl with plastic wrap and place the diced strawberries in the refrigerator until you are ready to fill your cake.
Prep three 8" round cake pans with butter, parchment paper, and flour. Simply coat the inside of the pan (bottom and sides) with butter or non-stick spray (butter works best), line the bottom with a parchment paper circle, and use all-purpose flour to lightly coat the sides of the pan to create a non-stick coating for your cake batter.
Preheat your oven to 350℉
In a mixing bowl, whisk together the flour, baking powder, and salt. Set aside.
In the bowl of your stand mixer fitted with a paddle attachment (or using an electric hand mixer), cream the butter and granulated sugar on medium speed for about 5 - 8 minutes until very light and fluffy.
Add the eggs, vanilla extract, and strawberry extract into the butter mixture and mix to combine. You can also add the optional pink gel food coloring at this step if you choose to use that. Scrape down the bowl using a rubber spatula and mix one more time to ensure that everything is combined.
Add the flour mixture to the butter mixture and mix on low speed. Gradually add the room temperature whole milk while the flour is slowly mixing until it is fully incorporated. If you are using an electric hand mixer as opposed to a stand mixer, simply add the flour and milk one cup at a time, mixing in between before adding the next cup.
Scrape down the bowl one more time and mix on medium speed for one minute.
Pour your batter into all three 8" cake pans and bake at 350℉ for 25 - 30 minutes or until a wooden toothpick inserted into the center comes out clean (baking time varies with each oven).
Let your cake layers cool in their pans for about 20 minutes before flipping them onto a wire cooling rack to finish the cooling process (you cannot stack & decorate your cake until it has COMPLETELY cooled!).
In the bowl of your stand mixer fitted with a paddle attachment, cream the butter on medium speed for 5 - 8 minutes until it is very light in color. You can also use an electric hand mixer.
Add the tiny pinch of fine salt, vanilla extract, strawberry extract, and the optional food coloring. Mix for about 1 - 2 minutes to combine (scrape down the bowl in between mixing).
Add all the powdered sugar and heavy cream, cover the top of your stand mixer bowl with plastic wrap or a kitchen towel, and mix to combine. If you are using an electric hand mixer, simply add the powdered sugar one cup at a time along with one tbsp of heavy cream at a time, mixing in between.
Scrape down the bowl and mix on medium speed for about 5 minutes until the buttercream is smooth.
Do not start the decorating process until your cake layers have COMPLETELY cooled!
Place a small dollop of strawberry buttercream to your cake stand where your first cake layer will rest. Add your first cake layer on to your cake stand and press it down into the buttercream dollop to ensure that it is in place (this acts as the "glue" to hold your cake in place as your decorate!).
Add as much or as little strawberry buttercream as you would like to the top of the first cake layer (make sure you save enough for your other cake layers). Smooth it out using an offset spatula or kitchen knife.
Create an indent in the buttercream to hold your strawberry filling without it spilling out over the edge (see video tutorial in the above blog post).
Add about ½ to ¾ of a cup of your strawberry filling inside of the indent that you just made in the buttercream and then stack the next cake layer on top of that.
Repeat the above steps until all three cake layers have been filled and stacked!
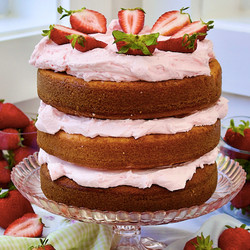
When you have your third and final cake layer on top, you can add your remaining buttercream as well as your remaining strawberry filling if you would like (the strawberry filling does not have to go on top if you do not want it to).
OPTIONAL: For extra decoration, cut about 4 whole strawberries in half and space them out evenly around the top edge of your cake (similar to the photos shown in the above blog post).
Slice your cake into 16 pieces, serve, and enjoy! (It is easiest to slice the cake into 8 total pieces and then cut those large slices in half to create 16 total servings).
If you would like to save any cake slices for later, wrap them in plastic wrap or place in an air-tight container and refrigerate for up to two days. You must refrigerate any leftover cake slices due to the strawberry filling!