 Sort ingredients
 moocow
 QR Code
 Listen
 Pdf
Pdf
Adjust the oven rack to the middle position, pre-heat the oven to 350ºF (180ºC) and line a 10x15 inch (25x38cm) rimmed baking sheet with parchment/baking paper. Lightly grease the parchment paper and the sides of the baking sheet with oil (you can also spray it with non-stick baking spray).Tip: Greasing the parchment paper ensures that the baked sponge will smoothly release from it without sticking.
Mix the instant coffee granules with the milk and heat them (either in the microwave or on the stovetop) until the mixture is hot and the coffee is fully dissolved. Set aside to cool until warm or at room temperature.
Using a stand mixer fitted with the whisk attachment or a hand mixer fitted with the double beaters, whisk the eggs and sugar together until pale, thick, fluffy and about tripled in volume (the ribbon stage). This should take about 5-7 minutes on a high speed setting.
Add the coffee-milk mixture, vanilla and melted butter, and whisk briefly until combined.
In a separate bowl, sift together the gluten free flour blend, xanthan gum, baking powder, baking soda and salt.
Add the dry ingredients to the egg mixture and whisk well for about 15-30 seconds until no flour clumps remain. Scrape down the bottom and sides of the bowl to prevent any unmixed patches.
Transfer the batter into the lined baking sheet and smooth it out into an even layer. You can tap it a few times on the counter to make it perfectly level and also to get rid of any large trapped air pockets.
Bake at 350ºF (180ºC) for about 10-12 minutes or until well risen, soft and spongy to the touch, and an inserted toothpick comes out clean.
Immediately out of the oven, cover the baking sheet with a large sheet of aluminium foil. Allow to cool to room temperature or lukewarm – ideally, the temperature of the sponge shouldn't drop below 72ºF (22ºC).Tip: Covering the sponge with aluminium foil traps the moisture within the sponge, making it much more pliable and flexible – and therefore less likely to crack when you roll it.
You can prepare this filling using a stand mixer fitted with the whisk attachment or with a hand mixer fitted with the double beaters.
Combine all the filling ingredients in a large bowl (or the bowl of a stand mixer, if using) and whip them to very soft peaks. Tip 1: Be careful not to over-whip the filling, as it does firm up with time, even if it’s just standing on the counter waiting to be used in the Swiss roll.Tip 2: Regardless of whether you use a stand or a hand mixer, I recommend whisking the filling on a low speed setting. This gives you better control over the texture/consistency of the filling and it lowers the chances of over-whipping it.
Mix together the coffee granules, sugar and hot water for the "coffee soak", until the coffee and sugar are fully dissolved.
Allow to cool until warm or at room temperature.
Once sufficiently cooled, gently loosen the sponge from the edges of the baking sheet with an offset spatula or a thin knife. Lightly dust the top of the sponge with powdered/icing sugar, to prevent sticking.
Turn it out onto a large sheet of parchment/baking paper, so that the caramelised “skin” side is facing down (so that it’s on the outside of the Swiss roll when you roll it up).
Peel away the parchment paper that used to line the baking sheet.
Use a pastry brush to gently brush the sponge with the coffee soak. You might not need all of it – don’t over-soak the sponge, as that can make it too fragile.
Spread just over half of the mascarpone filling evenly across the sponge, all the way to the edges.
Turn the sponge so that a short edge is closest to you. Using the parchment/baking paper underneath to help you, roll up the sponge until you get a 10 inch (25cm) long log.Tip: Make sure to keep the roll fairly tight from the very beginning, otherwise you’ll be left with an empty hole in the centre of your Swiss roll.
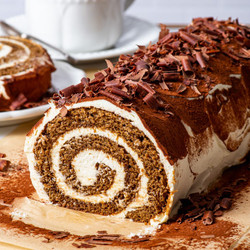
Use the remaining mascarpone filling to cover the outside of the cake (you can cover the ends of the cake or leave them "open" as I've done – see blog post for photos). For a fairly rustic look, use a small offset spatula or the back of a spoon to create loose swirls and swoops of the mascarpone cream.
At this stage, I recommend chilling the Swill roll overnight (or at least for 1-2 hours) before serving, to achieve both the best flavour and texture.However, if you’re in a hurry (or just very impatient) you can also serve it straight away.
Just before serving, dust the Swiss roll generously with cocoa powder and sprinkle on some chocolate shavings.
The tiramisu Swiss roll keeps well in a closed container in the fridge for 4-5 days.